Tables · テーブル
This page needs a recent browser (with SharedArrayBuffer support). Please update Chrome, Edge, Firefox or Safari to the latest version. · このページには最新のブラウザ(SharedArrayBuffer対応)が必要です。Chrome、Edge、Firefox、Safariを最新バージョンに更新してください。
English
Tables
- A table uses the
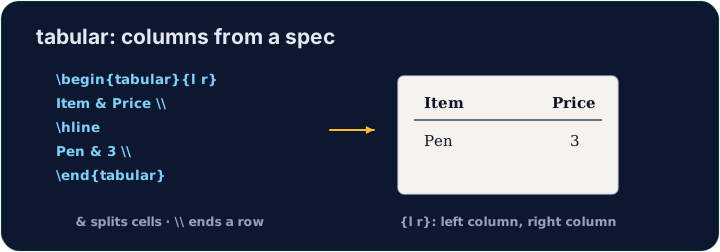
tabularenvironment. You first describe the columns:
{l c r}means three columns: left-aligned, centred, right-aligned.
日本語
テーブル
- テーブルには
tabularエンvironmentを使います。まず列を定義します:
\begin{tabular}{l c r}
  left & centre & right \\
\end{tabular}
{l c r}は3列を意味します:left(左揃え)、centred(中央揃え)、right(右揃え)。
English
Rows and cells
- Inside,
&jumps to the next column and\\starts a new row:
- The number of cells in each row must match the number of columns you declared.
日本語
行とセル
- 内部で
&は次の列へ移動し、\\は新しい行を始めます:
\begin{tabular}{l l}
  Apple & 5 \\
  Banana & 3 \\
\end{tabular}
- 各行のセル数は、定義した列数と一致している必要があります。
English
Lines (optional)
- Add
|between column letters for vertical lines, and\hlinefor horizontal ones:
- For a cleaner look, professionals use the
booktabspackage instead of many lines.
日本語
線(任意)
- 縦線を追加するには列名の間に
|を、横線には\hlineを入れます:
\begin{tabular}{|l|l|}
  \hline
  Apple & 5 \\ \hline
\end{tabular}
- よりきれいな見出しにするため、プロは多くの線を使う代わりに
booktabsパッケージを使用します。
English
Common mistakes
tabularneeds a column spec like{lcr}; separate cells with&and end rows with\\.- The number of
&per row must fit the column spec.
日本語
よくあるミス
tabularは{lcr}のような列仕様を必要とし、セルを&で分け、行を\\で終了させます。- 各行の
&の数が列仕様に合う必要があります。
Build a small two-column table with \begin{tabular}{l l}. Separate the two cells in a row with &, and end each row with \\. Add the rows for Bob (30) and Mei (25). · \begin{tabular}{l l}で2カラムの小さなテーブルを作成してください。行内の2つのセルを&で区切り、各行を\\で終了させてください。Bob (30) と Mei (25) の行を追加してください。
Click Run to compile and preview the PDF. · コンパイルしてPDFをプレビューするには「実行」をクリックしてください。
Add lines to the table. Put \hline at the top, after the header row, and at the bottom, and use |l|l| in the column spec for vertical lines. · テーブルに線を追加してください。ヘッダー行の後に\hlineを上部と下部に入力し、列指定に|l|l|を使用して縦線を作ってください。
Click Run to compile and preview the PDF. · コンパイルしてPDFをプレビューするには「実行」をクリックしてください。